The Digital Age and the Internet of Things
"Plus A Ham Radio Project for the Digital Age"

Welcome To the Fourth Industrial Revolution, The Digital Age!


Please note you need to be a licensed radio amateur to gain access and use AllStarLink.

What follows next is the detailed documentation of my own "Hotspot Node" build that I use to access the AllStar Link network.
Parts Inventory For Building My Node Hot Spot
Baofeng BF-888S 16 CH UHF 2 Way Radio - available for £10.00 or less from eBay
CM108 USB Sound Card - available for £5.00 or less from eBay
Raspberry PI 3 Model B Plus - available for £30.00 or less from eBay
Raspberry PI 4 Genuine Power Supply - available for £11.00 or less from Amazon
LM2596 DC-DC Buck Converter - available for £2.50 or less from eBay
LM317 Variable, DC, Regulator Module - available for £2.95 or less from eBay
Aluminium Enclosure Case 54x154x150mm - available for £14.00 or less from eBay
Miniature SPST Toggle Switch - available for £1.49 or less from eBay
Miniature Momentary Push to Make Switch - available for £1.49 or less from eBay
DC Chassis Power Socket 2.1mm - available for £1.00 or less from eBay
DC Power Plug 2.1mm - available for £1.00 or less from eBay
1 of 5mm Standard Diffused RED LED - available for £0.99 or less from eBay
1 of 5mm RGB Diffused Common Cathode LED - available for £0.99 or less from eBay
RJ45 Panel Mount Socket With short Cable/Plug - available for £6.99 or less from Amazon
8 of M3 & M2.5 PCB Standoff Spacers - available from eBay or Amazon in kits
M3 & M2.5 Screws - available from eBay or Amazon in kits
Various Cable Connectors - Molex etc
2.4mm Heat Shrink Sleeve - available in 1 Meter lengths for £0.99 or less from eBay
3M Stick on Rubber Feet 20mm by 20mm - available for £1.75 or less from eBay
Front Panel Label - produced in Corel Draw on personal computer
A Few resistors & capacitors - from any electronics part supplier or eBay
An affordable transceiver
My AllStar Link node is built around a cheap Baofeng BF-888S UHF hand-held transceiver commonly available from eBay & Amazon. The transceivers have 16 channels that are programmable via an optional USB cable. The BF-888S has gone through several revisions, mainly with changes to the PCB. The version that I have is the latest revision with a short PCB and a USB battery charger. Previous revisions contained a longer PCB and a plug-in mains power supply for charging the battery.
The radios are factory programmed at various frequencies around 462 MHz; this is outside the UHF amateur radio spectrum so the radio's are not usable for ham use straight out of the box.
In preparation for building an Allstar link node, the radio needs programming to a suitable node frequency. I used the free Chirp software to program my radio using a USB cable purchased from eBay.
It should be noted that the radio can still be programmed or reprogrammed once it has been built into a node enclosure but it is easier to do it beforehand!

Baofeng BF-888s Prior To Being Stripped Down
Dismantling the transceiver
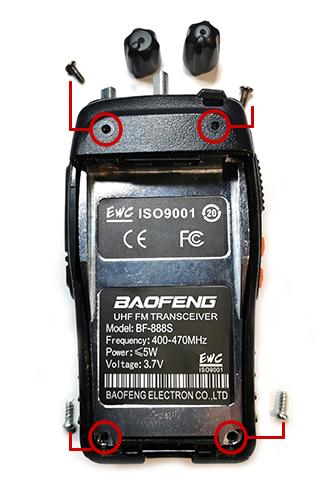
First remove the battery if it is attached, pull off the volume and channel change knobs and remove the four screws, as shown below, note the bottom screws have a torx style screw head so you will need a torx T9 screwdriver for these.
Remove
the three brass nuts that secure the antenna socket, volume control and channel change switch. All of the nuts have slots cut into them and I found that a pair of tweezers fitted nicely into the slots, making their removal easy.
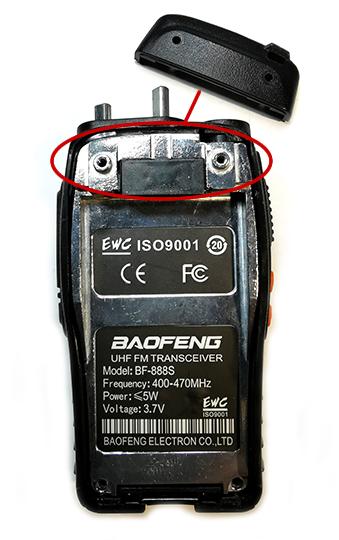
Separate the alloy chassis from the front plastic shell by lifting the bottom of the chassis up and sliding it back, as illustrated below.
De-solder the two speaker wires from the main PCB and discard the front plastic shell and speaker, as these will no longer be needed.
Remove the 4 small screws that secure the PCB to the alloy chassis, the plastic bush from the antenna socket and the rubber gasket from the jack sockets. Note at this stage the PCB will not separate from the chassis!
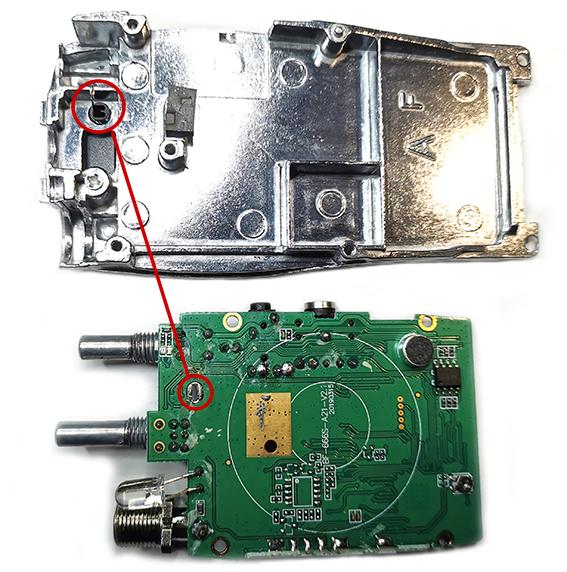
The final step of removing the PCB from the alloy chassis requires de-soldering a lug that connects the PCB to the positive battery terminal.

With the PCB now free of the chassis, de-solder and remove the antenna socket, which will be reused and mounted on the aluminium project case later. Also de-solder and remove the LED and Electret Condenser Microphone. The PCB holes are through hole plated so care should be taken not to damage these while removing components.

The Baofeng radio transceiver is now stripped and ready for the next stage, where I will add all the necessary wiring for connecting to the CM108 USB sound card and power supply.
Until next time...


No comments:
Post a Comment
I appreciate your comments on the blog content, however the blog has been subject to idiots trying to use the comments facility as a means to post advertisements & spam so all comments are now approved and moderated.